 Importing Revit
Revit files (.rvt or .rfa) created in versions 2011 through 2023 can be imported or referenced. Both .rvt and .rfa files can be imported/referenced individually; only .rfa files can be batch imported.
The 3D model imports as one or more design layers; a design layer is created for each story of a multi-story model.
2D views (floor plans, ceiling plans, and sheets) import as sheet layers, with the graphics inside the annotation group of an empty viewport.
Appropriate IFC data is automatically attached to all imported objects.
Other import options vary depending on whether a single file import or batch import is completed.
Importing a single Revit file
|
Command |
Path |
|
Import Revit |
File > Import |
Use the Import Revit command to import a single .rvt or .rfa file. You can control how the following Revit elements import:
Some Revit elements, such as walls and floors, can import as a Revit entity or as the appropriate Vectorworks native object type. For example, basic and arc walls can be imported as Vectorworks walls, with components and with wall joins preserved. Non-perpendicular walls and walls with horizontal peaks do not import as walls.
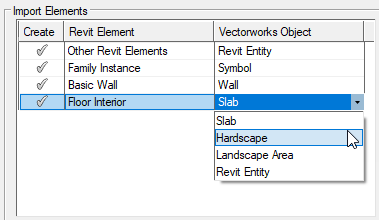
For Revit elements that may need to import as different Vectorworks object types depending on the context, you can select the object type needed; for example, a Revit floor object can import as a Vectorworks slab, hardscape, or landscape area object.
Windows and doors import as custom window and door symbols, and are properly placed in walls.
Revit families can import as a Revit entity or as symbols and associated resources. If you select to import as symbols, for .rfa files, a record is created for the family definition and for every nested family; for .rvt files, a record is created for every family definition.
Vectorworks uses Revit categories to create Vectorworks classes; you can optionally add a prefix to all imported classes.
To import or reference a single Revit (.rvt) or Revit family (.rfa) file:
Select the command.
Select the file to import.
The RVT/RFA Import Options dialog box opens.
Click to show/hide the parameters.Click to show/hide the parameters.
|
Parameter |
Description |
|
Import Views |
Select whether to import a 3D model and/or 2D views. For 2D views, imported graphics are placed on a sheet layer. For 3D views, graphics are placed on a design layer. |
|
2D views list |
If 2D views are selected for import, click in the list below to place a check mark next to views to import |
|
Classes |
|
|
Add prefix to imported Revit categories as classes |
Adds a prefix to all the Vectorworks classes created from Revit categories; enter the desired prefix text |
|
Reference |
References the original Revit file (master file), so that the imported objects can be updated when the master file changes. See Revit references below for more information about referencing. |
|
Absolute path |
Stores the absolute file path of the master file. Select this option when the location of the master file will not change in the future, or if the master file is on another volume. |
|
Path relative to current document |
Stores the file path of the master file relative to the target Vectorworks file; this option is available only if the master file is on the same volume as the target file. Select this option if the target file and the master file may be moved to another volume in the future. If you’re using server-based project sharing, and the master file is not on the same volume as the Project Sharing Server, you’ll be prompted to upload the file to the server’s project folder. |
|
Save referenced cache to disk |
Saves a copy of the referenced data with the target Vectorworks file. When this option is deselected, a copy of the referenced data is not saved, which means that the target file size is smaller; the referenced data is updated when the target file is opened. |
|
Automatically update out of date reference during file open |
Updates the reference each time the target Vectorworks file is opened; when deselected, the reference is updated only when Update is clicked from the References tab of the Organization dialog box. |
|
Import Elements |
|
|
Elements list |
The list displays the Revit elements present in the imported file. Click to place a check mark in the Create column next to elements to include in the import; at least one element must be selected. For each element selected for import, click the Vectorworks Object column, and then click the disclosure arrow to the right of the current object type to change the Vectorworks object type for that element. Only Vectorworks object types that are appropriate matches for the Revit element being imported are available for selection.
A Vectorworks object type change made in the elements list or in the Import as field automatically updates the other location. |
|
Import as |
Select one or more rows in the elements list, and select the Vectorworks object type for those rows. If different Revit elements are selected, all potential Vectorworks object types are available in the Import as list, but only appropriate Vectorworks object types can be assigned to a Revit element. For example, if the selection includes Basic Wall, Floor Interior, and Floor Exterior elements, and Slab is selected from the Import as list, only the two floor elements are assigned the slab Vectorworks object type. The wall cannot be imported as a slab. A Vectorworks object type change made in the elements list or in the Import as field automatically updates the other location. |
|
Import Revit Entities as |
For objects that cannot be imported as native objects, select which type of geometry to use for the Revit entity objects: Vectorworks mesh objects creates one or more mesh objects (smallest file size, reasonable import time). Groups of 3D polygons creates one or more groups of 3D polygons (largest file size, reasonable import time). Vectorworks solid objects creates one or more solid objects, or mesh objects where solids are not possible (reasonable file size, but the process can be very slow and import may take a long time). |
|
Textures |
|
|
Import textures and texture mapping |
Imports textures as resources and applies them to the appropriate created objects or components |
Specify the import information, and click OK.
The progress of the import is displayed for each imported file during import.
Importing Revit family files as a batch
|
Command |
Path |
|
Import Revit (Batch) |
File > Import |
Use the Import Revit (Batch) command to quickly import multiple Revit family (.rfa) files. Revit families import as symbols and associated resources, and a record is created for the family definition and for every nested family.
To batch import Revit files:
Select the command.
The Import Revit (Batch) dialog box opens.
Click to show/hide the parameters.Click to show/hide the parameters.
|
Parameter |
Description |
|
Source |
|
|
One or more Revit family (.rfa) files |
Imports only one file or only certain files within a folder. Click Choose Files and choose one or more Revit files to import. The number of files selected and their location is displayed. |
|
All Revit family (.rfa) files in folder |
Imports all .rfa files from a specified folder. Click Choose Folder and choose the source folder. |
|
Include subfolders |
If All Revit family files in folder is selected, includes all .rfa files in all subfolders |
|
Destination |
|
|
Current file |
Imports the selected file(s) into the current file as separate resources (textures, symbol definitions, and so on); no objects are created in the drawing |
|
New files in Folder |
Converts the selected file(s) into new, separate Vectorworks files in the selected folder. Click Choose Folder to select the location. Each file created contains resources (textures, symbol definitions, and so on), and objects are created in the drawing. This is the best option when converting many files. |
Specify the import information, and click OK.
The progress of the import is displayed for each imported file during import. The final results of the import process display in the RFA Import Result dialog box.
Click Details to open the results log file. The log text file, named Revit Import Log, is placed in the specified destination folder if it exists, or in the Vectorworks user folder. New log information is appended to any existing log file. The report provides a summary of the import, including a list of which files succeeded, and which failed.
Revit references
When you import a single Revit file, you can choose to reference the original file, instead of importing the objects directly. This allows you to easily update the imported objects when the original file changes. It also prevents the creation of additional classes, layers, and resources.
Create the reference during the import process, or create a new reference from the Organization dialog box or the Navigation palette. By default, the Revit file is imported as Referenced object, which is actually a design layer viewport. Optionally, you can choose the Layer import setting in the Organization dialog box to import to a referenced design layer instead.
See Concept: Workgroups and referencing for more information about creating and using references.
If the reference is a design layer viewport, you can edit the viewport as follows (also see Modifying viewports):
From the Object Info palette, edit the classes and layers shown in the viewport.
Right-click on the viewport and select the Edit Crop command to edit the viewport crop.
